The DIP Token

The DIP token is the essential utility token of the Etherisc ecosystem

How to buy DIP tokens?

To buy Etherisc DIP tokens, currently you will need to use a Decentralized Exchange (DEX) like Uniswap https://app.uniswap.org/swap

The easy way to do this is using 

Ethereum Mainnet:
Token Tracker:  0xc719d010b63e5bbf2c0551872cd5316ed26acd83
Dex: https://app.uniswap.org/swap


Gnosis Chain:
 
Token Tracker: 0x48b1b0d077b4919b65b4e4114806dd803901e1d9
Bridge: https://omni.legacy.gnosischain.com/bridge
Dex: 
https://honeyswap.1hive.eth.limo/#/swap

Base Chain: 
Token Tracker: 0xAc86f3556cBd2b4d800D17ADC3a266B500FCB9F5
XSwap Bridge: 
https://xswap.link/bridge
Transporter.io Bridge: https://app.transporter.io/
Dex: https://app.uniswap.org/swap
(Select Base Chain and paste the address of the token to trade: 0xAc86f3556cBd2b4d800D17ADC3a266B500FCB9F5)

What's in this guide?

The following covers installing and setting up a MetaMask wallet, then how to buy Ether (ETH) and how to swap the Ether for DIP tokens. This guide was correct at the time of writing but changes to MetaMask and other services described are outside of our control. In the event that something is different, refer to the help on the relevant official website.

Let's jump in!

Before installing a wallet, you should check that your device has up to date software and security, and consider how easy it is for others to monitor and access it without your permission.

1. Install MetaMask:

Open your web browser and visit the MetaMask website (https://metamask.io). Always check the website address in your browser carefully before downloading a wallet.

Click on the "Download for Your-Browser" button to download the MetaMask extension for your browser.

Follow the installation instructions provided by your browser to add the MetaMask extension.

2. Set up your MetaMask wallet:

Once MetaMask is installed, click on the fox icon in your browser toolbar to launch MetaMask. If it is not showing then you need to click on the puzzle Icon and pin fox.

Under "Let’s get started", tick the “I agree to Metamask’s Terms of use” and then select the "Create a new wallet" option.

You will then see a “Help us improve MetaMask” option which you can choose according to your own preference.

Next, create a strong and unique password for your wallet. Make sure to remember it or store it securely. This password is for your usual/day to day access to your wallet.

On the next screen, watch the video as it explains important things that you need to know. When you have understood the information given, select “Secure my wallet (recommended)”.

You will be shown a series of 12 words, this is your Secret Recovery Phrase.
Write down these words down by hand, numbered and in order, and store them securely offline. Do not lose them, EVER!!!  This is crucial for recovering your wallet in case of loss or device failure as they are your only way to regain access.
Avoid storing these words electronically, that includes a photo. Don’t allow anyone else to see or access these words as they give full control of your wallet.

Confirm the backup phrases by entering the missing words.

Your MetaMask wallet is now created, hooray!
You will be shown some configuration settings to set according to your preference. It is recommended to go to the “General” settings and set your local currency in the first option, and set the second option to “Fiat”. This will help you to avoid mistakes by showing you the value of transactions in your own currency. You can leave settings as they are and change them later if you need to. When done it should look like this -

3. Buy Ether using MetaMask:

In MetaMask, click on the "Buy" button, then “Get Started”.
Select your region and choose the payment method that suits you. MetaMask supports various payment options, including credit/debit cards, bank transfers, and other local payment methods.
Note that many credit card providers don’t like payments for cryptos, so they may block such transactions.

How much Ether do I need? You will need to purchase enough Ether to cover the value of the DIP tokens you wish to get, plus a little more to cover some transactions fees (these are dependent on Ethereum network conditions) and ideally have a small amount of Ether left to enable you to move or trade your DIP in future too.

Follow the instructions provided by MetaMask to complete the purchase of Ether using your preferred payment method. Take note of any fees or limits associated with the purchase and keep the transaction details for your records.

4. Check your Ether balance:

Once the purchase is complete, your newly acquired Ether will be available in your MetaMask wallet. To view your Ether balance, click on the MetaMask extension fox icon in your browser toolbar to open the pop-up.

5. Swap tokens using MetaMask:

In the MetaMask pop-up, click on the "Swap" button. If shown, select “Enable smart transactions”.

“Swap from”, this should be set to ETH if not already. Enter the amount of Ether that you wish to swap, leaving enough for future transactions if you want to avoid buying more Ether later.

“Swap to”, click then type “DIP” in the box. Then select the option that says “DIP Decentralized Insurance Protocol” with the Etherisc logo next to it.

Review the swap. checking you are happy to proceed with the fees and swap rate.

Once the transaction is complete, the DIP tokens will show in your MetaMask wallet under the “Assets” tab.

DIP Utility

DIP tokens give users access to the Decentralized Insurance Platform. By staking DIP token, participants provide collateral (bond) for risk pools and to guarantee future performance, availability, and service levels. Staking also signals quality and reputation. As a result, participants can earn money monetizing their skills, software (for example risk models or UI/UX), risk capital, insurance licenses, claim processing, or regulatory compliance/reporting services.

Staking for Risk Pools

Staked DIP activate risk capital for collateralizing policies
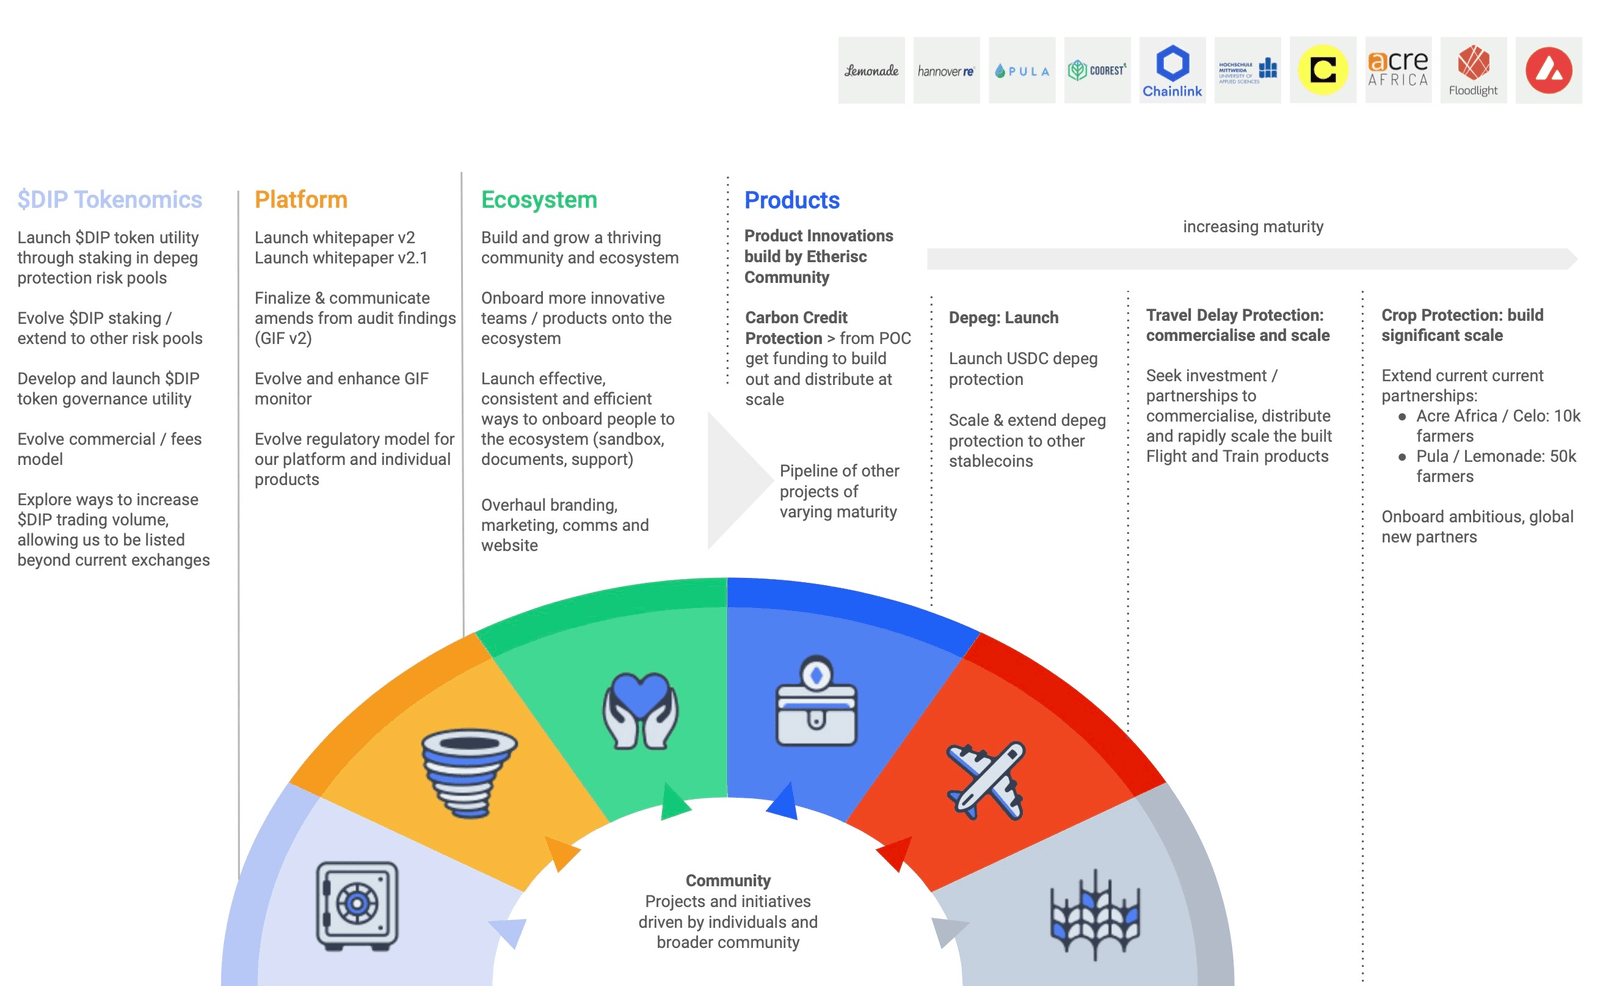
Staking for Services

Staked DIP allow access to services within the ecosystem

Staking for Governance

Staked DIP enables governance over the future of the protocol

The DIP Token Generating Event (TGE) - Jun 23rd to July 25th, 2018

Hardcap:
30 Million USD
Total Supply:
1 Billion 10⁹
Exchange Rate:
1 DIP = 0,10 USD
DIP Tokens distributed during TGE:
300M DIP (= 30% of total supply)
Only registered contributors were able to participate in the Etherisc DIP TGE

Revenue model for protocol users & crypto investors

Revenue modelRevenue model

The DIP Token

The Etherisc DIP Token (DIP) it’s the native token that empowers the Etherisc Ecosystem. The acronym "DIP" stands for "Decentralized Insurance Protocol".

Get up-to-date Token Infos on Coingecko

The DIP Token Generating Event (TGE) - Jun 23rd to July 25th, 2018

  • Hardcap: 30 Million USD
  • Total Supply: 1 Billion (10^9)
  • DIP Tokens distributed during TGE: 300M DIP (= 30% of total supply)
  • Exchange Rate: 1 DIP = 0,10 USD
  • Only registered contributors were able to participate in the Etherisc DIP TGE

DIP Utility

DIP tokens give users access to the Decentralized Insurance Platform. By staking DIP token, participants provide collateral (bond) for risk pools and to guarantee future performance, availability, and service levels. Staking also signals quality and reputation. As a result, participants can earn money monetizing their skills, software (for example risk models or UI/UX), risk capital, insurance licenses, claim processing, or regulatory compliance/reporting services.

The three utilities of the DIP Token are: 

  1. Staking for Risk Pools
  2. Staking for Services / Quality
  3. Staking for Governance

How to buy DIP tokens?

To buy Etherisc DIP tokens, currently you will need to use a Decentralized Exchange (DEX).

The easy way to do this is using the MetaMask (metamask.io) wallet. It has a swap button. The function talks to various DEXs, automatically finding the optimal trades to get you the best price for your order. It can also be used with popular hardware wallets if you decide to get one. So we will use it for our guides.

What's in this guide?

The following covers installing and setting up a MetaMask wallet, then how to buy Ether (ETH) and how to swap the Ether for DIP tokens. This guide was correct at the time of writing but changes to MetaMask and other services described are outside of our control. In the event that something is different, refer to the help on the relevant official website.

Let's jump in!

Before installing a wallet, you should check that your device has up to date software and security, and consider how easy it is for others to monitor and access it without your permission.

1. Install MetaMask:

Open your web browser and visit the MetaMask website (https://metamask.io). Always check the website address in your browser carefully before downloading a wallet.

Click on the "Download for Your-Browser" button to download the MetaMask extension for your browser.

Follow the installation instructions provided by your browser to add the MetaMask extension.

2. Set up your MetaMask wallet: 

Once MetaMask is installed, click on the fox icon in your browser toolbar to launch MetaMask. If it is not showing then you need to click on the puzzle Icon and pin fox.

Under "Let’s get started", tick the “I agree to Metamask’s Terms of use” and then select the "Create a new wallet" option.

You will then see a “Help us improve MetaMask” option which you can choose according to your own preference.

Next, create a strong and unique password for your wallet. Make sure to remember it or store it securely. This password is for your usual/day to day access to your wallet.

On the next screen, watch the video as it explains important things that you need to know. When you have understood the information given, select “Secure my wallet (recommended)”.

You will be shown a series of 12 words, this is your Secret Recovery Phrase.
Write down these words down by hand, numbered and in order, and store them securely offline. Do not lose them, EVER!!!  This is crucial for recovering your wallet in case of loss or device failure as they are your only way to regain access.
Avoid storing these words electronically, that includes a photo. Don’t allow anyone else to see or access these words as they give full control of your wallet.

Confirm the backup phrases by entering the missing words.

Your MetaMask wallet is now created, hooray!
You will be shown some configuration settings to set according to your preference. It is recommended to go to the “General” settings and set your local currency in the first option, and set the second option to “Fiat”. This will help you to avoid mistakes by showing you the value of transactions in your own currency. You can leave settings as they are and change them later if you need to. When done it should look like this -

3. Buy Ether using MetaMask:

In MetaMask, click on the "Buy" button, then “Get Started”.
Select your region and choose the payment method that suits you. MetaMask supports various payment options, including credit/debit cards, bank transfers, and other local payment methods.
Note that many credit card providers don’t like payments for cryptos, so they may block such transactions.

How much Ether do I need? You will need to purchase enough Ether to cover the value of the DIP tokens you wish to get, plus a little more to cover some transactions fees (these are dependent on Ethereum network conditions) and ideally have a small amount of Ether left to enable you to move or trade your DIP in future too.

Follow the instructions provided by MetaMask to complete the purchase of Ether using your preferred payment method. Take note of any fees or limits associated with the purchase and keep the transaction details for your records.

4. Check your Ether balance: 

Once the purchase is complete, your newly acquired Ether will be available in your MetaMask wallet. To view your Ether balance, click on the MetaMask extension fox icon in your browser toolbar to open the pop-up.

5. Swap tokens using MetaMask: 

In the MetaMask pop-up, click on the "Swap" button. If shown, select “Enable smart transactions”.

“Swap from”, this should be set to ETH if not already. Enter the amount of Ether that you wish to swap, leaving enough for future transactions if you want to avoid buying more Ether later.

“Swap to”, click then type “DIP” in the box. Then select the option that says “DIP Decentralized Insurance Protocol” with the Etherisc logo next to it.

Review the swap. checking you are happy to proceed with the fees and swap rate.

Once the transaction is complete, the DIP tokens will show in your MetaMask wallet under the “Assets” tab.

Etherisc Logo with Bird
Contact us

Etherisc has received grants from the
Decentralized Insurance Foundation,
Gotthardstr. 26
6300 Zug
Switzerland

contact@etherisc.com

Etherisc GmbH
Ruth-Drexel-Str. 154
81927 München
Germany